Linux 云服务器配置 Oh My Zsh
1. 安装 Zsh
# 安装 Zsh
sudo apt install zsh

# 将 Zsh 设置为默认 Shell
chsh -s /bin/zsh

# 可以通过 echo $SHELL 查看当前默认的 Shell,如果没有改为 /bin/zsh,那么需要重启 Shell。

# 安装完成后,直接用zsh指令就可以切换了
2. 安装 Oh My Zsh
# 安装 Oh My Zsh
wget https://github.com/robbyrussell/oh-my-zsh/raw/master/tools/install.sh -O - | sh

# gitee加速
wget https://gitee.com/mirrors/oh-my-zsh/raw/master/tools/install.sh -O - | sh

bash ./install.sh
3. Oh My Zsh 配置
3.1 zsh-autosuggestions
命令行命令键入时的历史命令建议插件
git clone https://github.com/zsh-users/zsh-autosuggestions ${ZSH_CUSTOM:-~/.oh-my-zsh/custom}/plugins/zsh-autosuggestions

更新:

git clone https://gitee.com/han8gui/zsh-autosuggestions.git ${ZSH_CUSTOM:-~/.oh-my-zsh/custom}/plugins/zsh-autosuggestions
3.2 zsh-syntax-highlighting
命令行语法高亮插件
git clone https://github.com/zsh-users/zsh-syntax-highlighting.git ${ZSH_CUSTOM:-~/.oh-my-zsh/custom}/plugins/zsh-syntax-highlighting
 或者
 git clone https://github.com/zsh-users/zsh-syntax-highlighting.git
echo "source ${(q-)PWD}/zsh-syntax-highlighting/zsh-syntax-highlighting.zsh" >> ${ZDOTDIR:-$HOME}/.zshrc


更新:
git clone https://gitee.com/Annihilater/zsh-syntax-highlighting.git ${ZSH_CUSTOM:-~/.oh-my-zsh/custom}/plugins/zsh-syntax-highlighting
4. 修改~/.zshrc
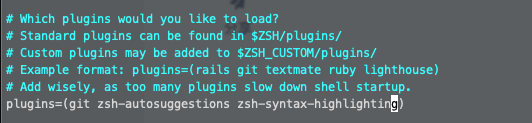
修改图片中 plugins 的内容
# 主要的几个配置选项

# Path to your oh-my-zsh installation.
export ZSH="/root/.oh-my-zsh"


# ZSH_THEME="robbyrussell"
# 设置字体模式以及配置命令行的主题,语句顺序不能颠倒
POWERLEVEL9K_MODE='nerdfont-complete'
ZSH_THEME="ys"
# ZSH_THEME="powerlevel9k/powerlevel9k"


# 以下内容去掉注释即可生效:
# 启动错误命令自动更正
ENABLE_CORRECTION="true"

# 在命令执行的过程中,使用小红点进行提示
COMPLETION_WAITING_DOTS="true"

# 要使用的插件
plugins=(
        git
        extract
        zsh-autosuggestions
        zsh-syntax-highlighting
)

source $ZSH/oh-my-zsh.sh
source $ZSH_CUSTOM/plugins/zsh-autosuggestions/zsh-autosuggestions.zsh


# python虚拟环境相关设置
if [ -f /usr/local/bin/virtualenvwrapper.sh ]; then
    export WORKON_HOME=$HOME/.virtualenvs
    export VIRTUALENVWRAPPER_PYTHON=/usr/bin/python3
    source /usr/local/bin/virtualenvwrapper.sh
fi